Thursday, 3 December 2015

Spring 4 MultipartFile and Angular File Upload with Spring Security

Hi,

In Angular file upload is a bit tricky as ng-model doesn't support file and in JSON we can't send file.
In Spring with File Multipart accepting with other values is complex to implement.

It was time consuming to find approaches to Upload file from Angular and Accepting as File MultiPart in Spring.

Angular side

1. Create a directive to fetch the file.
2. Inject all required things to the Controller.

Here in Directive restrict type 'A' is used. You can change with any type if required.

I have used JSP to ease with csrf tokens.

 <!--  
 Author : Ramakrishna Panni  
 name: fileUpload.jsp  
 details: To test file upload with a File,Pic and a String   
 -->  
 <%@ page language="java" contentType="text/html; charset=ISO-8859-1"  
   pageEncoding="ISO-8859-1"%>  
   <%@ taglib prefix="c" uri="http://java.sun.com/jsp/jstl/core"%>  
 <html>  
 <head>  
      <meta name="_csrf" content="${_csrf.token}"/>  
      <!-- default header name is X-CSRF-TOKEN -->  
      <meta name="_csrf_header" content="${_csrf.headerName}"/>  
  <script src="http://ajax.aspnetcdn.com/ajax/jQuery/jquery-1.11.3.min.js"></script>  
  <script src="//ajax.googleapis.com/ajax/libs/angularjs/1.2.24/angular.min.js"></script>  
 </head>  
 <body ng-app='fileUpload' ng-controller='UploadController'>  
      <form enctype="multipart/form-data"  
           ng-submit="submitForm()">  
           File to upload: <input type="file" file-model="cvBlob"><br /> Name: <input  
                type="text" name="name" ng-model="result.success"><br /> <br />   
           Pic to Upload:     <input type="file" file-model="picBlob"><br /> <br /><input type="submit"  
                value="Upload"> Press here to upload the file!  
                <input type="hidden" id="csrf" name="${_csrf.parameterName}" value="${_csrf.token}" />  
      </form>  
      <script type="text/javascript">  
      var upload = angular.module('fileUpload', []);  
      upload.controller('UploadController', ['$scope', '$window','$http', function($scope, $window,$http,fileUpload) {  
            $scope.result = {};  
            var token = $("meta[name='_csrf']").attr("content");  
         var header = $("meta[name='_csrf_header']").attr("content");  
            $scope.submitForm = function(){  
                 var pic = $scope.picBlob;  
                 var cv = $scope.cvBlob;  
                 var uploadUrl = "/upload?_csrf="+token  
                 console.log(pic);  
                 var fd = new FormData();  
                 fd.append('pic', pic);  
               fd.append('cv', cv);  
               fd.append('result',JSON.stringify($scope.result));  //You should make it to String while sending
               $http.post(uploadUrl, fd, {  
                    transformRequest: function (data, headersGetterFunction) {  
                   return data;  
                  },  // To take Http Request and Headers and making it Serialized, without serizlized object Spring will give Media Not Supported error
                    headers: {'Content-Type': undefined}  
               }) .success(function(data){  
                    if (data.error === "") {  
                       // Showing errors.  
                            $scope.success = data.success;  
                      } else {  
                           $scope.error = data.error;  
                      }   
               })  
               .error(function(){  
               });       
            };  
       }]);  
      upload.directive('fileModel', ['$parse', function ($parse) {  
             return {  
               restrict: 'A',  
               link: function(scope, element, attrs) {  
                 var model = $parse(attrs.fileModel);  
                 var modelSetter = model.assign;  
                 element.bind('change', function(){  
                   scope.$apply(function(){  
                     modelSetter(scope, element[0].files[0]);  
                   });  
                 });  
               }  
             };  
           }]);  
      </script>  
 </body>  
 </html>  

Points to look on
  • Append every data in FormData object using property tags.
  • Stringify  JSON  append in FormData
  • Transform the request with headers as Serialized 
  • Make Content Undefined as Angular will convert it to right one

Spring Side

  1. Create Bean of  "MultipartResolver"
  2. Add Multipart Filter in "AbstractSecurityWebApplicationInitializer"
JAR's needed commons-io,commons-fileupload and jackson.

MultipartResolver Bean

In this you can set the max upload size,encoding, lazy resolve,temp directory and others.
Define in Application configuration class.
 @Bean(name = "filterMultipartResolver")  
       public CommonsMultipartResolver commonsMultipartResolver(){  
            CommonsMultipartResolver commonsMultipartResolver = new CommonsMultipartResolver();  
            commonsMultipartResolver.setDefaultEncoding("utf-8");  
            commonsMultipartResolver.setMaxUploadSize(50000000);  
            return commonsMultipartResolver;  
       }  

MultipartFilter


Define in Application configuration class.
 protected void beforeSpringSecurityFilterChain(ServletContext servletContext) {  
        insertFilters(servletContext, new MultipartFilter());  
       }  

Controller Class


 package com.mindfiresolutions.springmaven.controller;  
 import java.io.BufferedOutputStream;  
 import java.io.File;  
 import java.io.FileOutputStream;  
 import org.codehaus.jackson.map.ObjectMapper;  
 import org.springframework.stereotype.Controller;  
 import org.springframework.web.bind.annotation.RequestMapping;  
 import org.springframework.web.bind.annotation.RequestMethod;  
 import org.springframework.web.bind.annotation.RequestParam;  
 import org.springframework.web.bind.annotation.ResponseBody;  
 import org.springframework.web.multipart.MultipartFile;  
 import com.mindfiresolutions.springmaven.models.Result;  
 /**  
  * Author: Ramakrishna Panni  
  * Class: FileUploadController  
  * Details: Created to handle Sample file Upload  
  */  
 @Controller  
 public class FileUploadController {  
   @RequestMapping(value="/upload", method=RequestMethod.GET)  
   public @ResponseBody Result provideUploadInfo() {  
        Result res = new Result();  
        res.setError("You can upload a file by posting to this same URL.");  
     return res;  
   }  
   @RequestMapping(value="/upload", method=RequestMethod.POST, consumes = {"multipart/form-data"})  
   public @ResponseBody Result handleFileUpload( @RequestParam("result") String res, @RequestParam("cv") MultipartFile file, @RequestParam("pic") MultipartFile pic){  
        Result result = new Result();  
        ObjectMapper mapper = new ObjectMapper();  
           Result resNew = new Result();  
           try {  
                resNew = mapper.readValue(res,Result.class);  
           } catch (Exception e) {  
                result.setError("JSON mapping failed"+e.getMessage());  
                return result;  
           }   
        if (!pic.isEmpty()) {  
             try {  
         byte[] bytes = pic.getBytes();  
         BufferedOutputStream stream =  
             new BufferedOutputStream(new FileOutputStream(new File("pic.jpg")));  
         stream.write(bytes);  
         stream.close();  
         result.setSuccess("You successfully uploaded "+resNew.getSuccess());  
         return result;  
       } catch (Exception e) {  
            result.setError("You failed to upload " + e.getMessage());  
       }  
     } else {  
          result.setError("You failed to upload because the file was empty.");  
        }  
     if (!file.isEmpty()) {  
       try {  
         byte[] bytes = file.getBytes();  
         BufferedOutputStream stream =  
             new BufferedOutputStream(new FileOutputStream(new File("new.txt")));  
         stream.write(bytes);  
         stream.close();  
         result.setSuccess("You successfully uploaded "+resNew.getSuccess());  
         return result;  
       } catch (Exception e) {  
            result.setError("You failed to upload " + e.getMessage());  
         return result;  
       }  
     } else {  
          result.setError("You failed to upload because the file was empty.");  
       return result;  
     }  
   }  
 }  

Points to look on

  • @RequestParam with the property tag name should be used to get Stringified JSON.
  • @RequestPart with the property tag name should be used to get MultiPartFile.
  • Object Mapper will help to make String to Object.
Thanks,

Sunday, 22 November 2015

Spring Security 4 Login Example using Hibernate & Annotations without using XML Configuration

Hi,

I faced some difficulties while setting up login using Spring Security 4 login without XML configuration. I thought of writing it, so others can refer and save time while developing.

Environment used
  • IDE: STS
  • Database: MySql 
  • Project Management: Maven
  • Server: Jetty (Default Server looks for Web.xml)
ImportantJAR's used
  • Jackson JSON Mapper JAR version 1.9.10
  • Spring Security JAR version 4.0.2 (Web,Config,Data & Taglibs)
  • Spring webMVC JAR
  • JPA, Spring Data, HSQL, MySQL JAR's
  • Other Web Dependency JAR's
STS latest release is 3.7.1 it will create web.xml file for Spring project by default. So use 
File->New->Maven Project. It won't create web.xml

Add the above mentioned JAR's to POM.

I have explained Security Config and CustomAuthenticationProvider class here, get whole project from GIT.

SecurityConfig.java
 package com.springsecurityblog.config;  
 /**  
  * Author: Ramakrishna Panni  
  * Class: SecurityConfig  
  * Details: It does configure for Login page, Logout page, Failure page and CSRF token management  
  */  
 import org.springframework.beans.factory.annotation.Autowired;  
 import org.springframework.context.annotation.Bean;  
 import org.springframework.context.annotation.Configuration;  
 import org.springframework.security.authentication.AuthenticationManager;  
 import org.springframework.security.authentication.AuthenticationProvider;  
 import org.springframework.security.config.annotation.authentication.builders.AuthenticationManagerBuilder;  
 import org.springframework.security.config.annotation.web.builders.HttpSecurity;  
 import org.springframework.security.config.annotation.web.configuration.EnableWebSecurity;  
 import org.springframework.security.config.annotation.web.configuration.WebSecurityConfigurerAdapter;  
 import org.springframework.security.data.repository.query.SecurityEvaluationContextExtension;  
 import org.springframework.security.web.csrf.CsrfTokenRepository;  
 import org.springframework.security.web.csrf.HttpSessionCsrfTokenRepository;  
 @Configuration  
 @EnableWebSecurity  
 public class SecurityConfig extends WebSecurityConfigurerAdapter{  
   @Autowired  
   private AuthenticationProvider customAuthenticationProvider;   
      @Autowired  
      public void configure(AuthenticationManagerBuilder auth) throws Exception {  
            auth  
            .authenticationProvider(customAuthenticationProvider);  
   }  
       @Override  
        protected void configure(HttpSecurity http) throws Exception {  
          http.authorizeRequests().antMatchers("/assets/**").permitAll()  
          .and()  
            .formLogin().loginPage("/loginPage")  
              .defaultSuccessUrl("/homePage")  
              .failureUrl("/loginPage?error")  
              .usernameParameter("username").passwordParameter("password")     
              .and().csrf().csrfTokenRepository(csrfTokenRepository())  
            .and()  
              .logout().logoutSuccessUrl("/loginPage?logout");   
        }  
   @Bean  
   public SecurityEvaluationContextExtension securityEvaluationContextExtension() {  
     return new SecurityEvaluationContextExtension();  
   }  
   @Override  
   public AuthenticationManager authenticationManagerBean() throws Exception {  
    return super.authenticationManagerBean();  
   }  
   private CsrfTokenRepository csrfTokenRepository()   
   {   
     HttpSessionCsrfTokenRepository repository = new HttpSessionCsrfTokenRepository();   
     repository.setSessionAttributeName("_csrf");  
     return repository;   
   }  
 }  

What does Security Config do?

It  configures Authentication provider of configure method where the Role and Authentication of request is done. It does http security configuration with which URL to permit, login URL's and it also configures whether the application needs CSRF token generation. We can configure Success handlers for login and others here too. It extends "WebSecurityConfigurerAdapter" of Spring Framework Security.

CustomAuthenticationProvider.java
 package com.springsecurityblog.config;  
 /**  
  * Author: Ramakrishna Panni  
  * Class: CustomAuthenticationProvider  
  * Details: It is used to get credentials and authorize the request with roles  
  */  
 import java.util.HashSet;  
 import java.util.Set;  
 import org.springframework.beans.factory.annotation.Autowired;  
 import org.springframework.security.authentication.AuthenticationProvider;  
 import org.springframework.security.authentication.BadCredentialsException;  
 import org.springframework.security.authentication.UsernamePasswordAuthenticationToken;  
 import org.springframework.security.core.Authentication;  
 import org.springframework.security.core.AuthenticationException;  
 import org.springframework.security.core.GrantedAuthority;  
 import org.springframework.security.core.authority.SimpleGrantedAuthority;  
 import org.springframework.stereotype.Component;  
 import com.springsecurityblog.model.Employee;  
 import com.springsecurityblog.model.Role;  
 import com.springsecurityblog.service.AccountService;  
 @Component("AuthenticationProvider")  
 public class CustomAuthenticationProvider implements AuthenticationProvider {  
       @Autowired  
       private AccountService accountService;  
       public Authentication authenticate(Authentication authentication)   
           throws AuthenticationException {  
                      String username = authentication.getName();  
                      String password = (String) authentication.getCredentials();  
            Employee member = accountService.findAccountByUsername(username);  
            //For username not valid   
         if (member == null || !member.getEmployeeUserName().equalsIgnoreCase(username)) {  
           throw new BadCredentialsException("Username not found.");  
         }  
         //For password not valid  
         if (!password.equals(member.getPassword())) {  
           throw new BadCredentialsException("Wrong password.");  
         }  
         Set<GrantedAuthority> setAuths = new HashSet<GrantedAuthority>();  
         //Employee can have many roles  
         for (Role employeeRole : member.getEmpRoles()) {  
                    setAuths.add(new SimpleGrantedAuthority(employeeRole.getAuthority()));  
               }  
         return new UsernamePasswordAuthenticationToken(member, password, setAuths);   
          }  
           public boolean supports(Class<?> authentication) {  
                   return (UsernamePasswordAuthenticationToken.class.isAssignableFrom(authentication));  
                }  
 }  

What does CustomAuthenication Provider do?
Here we will get the login credential entered, which is captured by SecurityConfig class. By using Service methods we can get to know whether the credential is correct or wrong. Roles extends Authority, there can be many roles.

Here is the table created for Employee and Role Bean.


 CREATE TABLE `tblemployee` (  
   `ntEmpID` bigint(20) NOT NULL AUTO_INCREMENT,  
   `vcEmployeeUserName` varchar(30) NOT NULL,  
   `vcEmailIdOff` varchar(50) NOT NULL,  
   `vcEmailIdPer` varchar(50) NOT NULL,  
   `vcEmployeeFirstName` varchar(30) NOT NULL,  
   `vcEmployeeMiddleName` varchar(30) DEFAULT NULL,  
   `vcEmployeeLastName` varchar(30) NOT NULL,  
   `vcPresentAdd` varchar(150) NOT NULL,  
   `vcPermanentAdd` varchar(150) NOT NULL,  
   `vcHomePhoneNumber` varchar(10) DEFAULT NULL,  
   `vcOfficeNumber` varchar(10) NOT NULL,  
   `vcSkills` varchar(100) DEFAULT NULL,  
   `vcPassword` varchar(4000) NOT NULL,  
   `fsCV` tinyblob,  
   `fsEmployeePic` tinyblob,  
   PRIMARY KEY (`ntEmpID`),  
   UNIQUE KEY `UQ__tblEmplo__993FFD3B15DA3E5D` (`vcEmailIdPer`),  
   UNIQUE KEY `UQ__tblEmplo__96FFB61918B6AB08` (`vcEmailIdOff`),  
   UNIQUE KEY `UQ__tblEmplo__ED923BE51B9317B3` (`vcEmployeeUserName`)  
  ) ENGINE=InnoDB AUTO_INCREMENT=9 DEFAULT CHARSET=latin1  
 CREATE TABLE `tblemproles` (  
   `ntEmpRoleID` bigint(20) NOT NULL AUTO_INCREMENT,  
   `ntEmpID` bigint(20) NOT NULL,  
   `vcRole` varchar(45) NOT NULL,  
   PRIMARY KEY (`ntEmpRoleID`),  
   UNIQUE KEY `uni_empID_role` (`vcRole`,`ntEmpID`),  
   KEY `ntEmpID` (`ntEmpID`),  
   CONSTRAINT `tblemproles_ibfk_1` FOREIGN KEY (`ntEmpID`) REFERENCES `tblemployee` (`ntEmpID`) ON DELETE NO ACTION ON UPDATE NO ACTION  
  ) ENGINE=InnoDB AUTO_INCREMENT=11 DEFAULT CHARSET=latin1  
loginPage.jsp


 <%@ taglib prefix="c" uri="http://java.sun.com/jsp/jstl/core"%>  
 <html>  
 <head>  
      <script src="http://ajax.aspnetcdn.com/ajax/jQuery/jquery-1.11.3.min.js"></script>  
  <script src="//ajax.googleapis.com/ajax/libs/angularjs/1.5.0-beta.1/angular.min.js"></script>  
 </head>  
 <body ng-app='Login' onload='document.loginForm.username.focus();'>  
   <h3>TMS</h3>  
   <c:if test="${not empty error}"><div>${error}</div></c:if>  
   <c:if test="${not empty message}"><div>${message}</div></c:if>  
   <form name='login' action="<c:url value='/loginPage' />" method='POST'>  
     <table>  
       <tr>  
         <td>UserName:</td>  
         <td><input type='text' name='username' ng-model="login.username" value=''></td>  
       </tr>  
       <tr>  
         <td>Password:</td>  
         <td><input type='password' name='password' ng-model="login.password" /></td>  
       </tr>  
       <tr>  
         <td colspan='2'><button type="submit">Submit</button></td>  
       </tr>  
     </table>  
     <input type="hidden" name="${_csrf.parameterName}" value="${_csrf.token}" />  
   </form>  
 </body>  
 </html>  
homePage.jsp


 <%@taglib prefix="c" uri="http://java.sun.com/jsp/jstl/core"%>  
 <%@ taglib prefix="fn" uri="http://java.sun.com/jsp/jstl/functions" %>  
 <%@ taglib uri="http://www.springframework.org/security/tags" prefix="sec"%>  
 <!DOCTYPE html>  
 <html>  
 <head>  
  <meta charset="utf-8">  
  <meta http-equiv="X-UA-Compatible" content="IE=edge">  
  <meta name="_csrf" content="${_csrf.token}"/>  
      <!-- default header name is X-CSRF-TOKEN -->  
      <meta name="_csrf_header" content="${_csrf.headerName}"/>  
      <!-- ... -->  
  <title>Home</title>  
  <!-- Tell the browser to be responsive to screen width -->  
  <meta content="width=device-width, initial-scale=1, maximum-scale=1, user-scalable=no" name="viewport">  
  <!-- Bootstrap 3.3.5 -->  
  <!--Favicon Image -->  
 </head>  
 <body class="hold-transition skin-blue sidebar-mini">  
 <sec:authorize access="hasRole('ANONYMOUS')">  
      <c:redirect url="/loginPage"/>  
 </sec:authorize>  
 <p>Welcome, <sec:authentication property="principal.employeeUserName"/></p><br/>  
 <c:url value="/logout" var="Signout" />  
      <form id="logout" action="${Signout}" method="post" >  
            <input type="hidden" name="${_csrf.parameterName}" value="${_csrf.token}" />  
      </form>  
 </body>  
 </html>  
After Login
We land in Home page. There we can get all values through "principal"object using Security tags.

Thanks,

Monday, 2 November 2015

Spiral Value Assigned Matrix

Hi,


I got a question from my friend, if user gives input 6 or  any number it should show matrix in the form of normal and Spiral assigned values.

Matrix Size is: 6

Normal Matrix is:

    1    2    3    4    5    6
    7    8    9   10   11   12
   13   14   15   16   17   18
   19   20   21   22   23   24
   25   26   27   28   29   30
   31   32   33   34   35   36
Spiral Matrix is:

    1     2        3     4      5      6
   20    21    22    23    24     7
   19    32    33    34    25     8
   18    31    36    35    26     9
   17    30    29    28    27    10
   16    15    14    13    12    11

I had gone through the problem, got it can be solved in 4 recurring  steps.

 package newlearn;  
 import java.util.Scanner;  
 /**  
  *   
  * @author Ramakrishna Panni  
  *  
  */  
 public class SpiralMatrix {  
      public static void main(String[] args) {  
           // TODO Auto-generated method stub  
           try{  
                System.out.println("Enter matrix size to get spiral matrix");  
                Scanner sc = new Scanner(System.in);  
                String[] inter = sc.nextLine().trim().split(" ");  
                int size = Integer.parseInt(inter[0]);  
                System.out.println("Matrix Size is: "+size);  
                sc.close();  
                int higestValue = size*size;  
                int spiralMatrix[][] = new int[size][size];  
                int normalMatrix[][] = new int[size][size];  
                int normalValue = 0;  
                for(int i=0;i<size;i++)  
                {  
                     for(int j=0;j<size;j++)  
                     {  
                          normalMatrix[i][j] = ++normalValue;  
                          spiralMatrix[i][j] = 0;  
                     }  
                }  
                System.out.println("Normal Matrix is:\n");  
                for(int i=0;i<size;i++)  
                {  
                     for(int j=0;j<size;j++)  
                     {  
                          System.out.printf("%5d",normalMatrix[i][j]);  
                     }  
                     System.out.println("");  
                }  
                int lastValue=0;  
                int step = 1;  
                int step1Col = 0;  
                int step1Row = 0;  
                int step2Col = 0;  
                int step2Row = 0;  
                int step3Col = 0;  
                int step3Row = 0;  
                int step4Col = -1;  
                int step4Row = 0;  
                while (lastValue < higestValue) {  
                     step = 1;  
                     //this is the step where value assigned in Horizontal incrementing positional way  
                     if(step == 1)  
                     {  
                          step1Row = step4Row;  
                          step1Col = ++step4Col;  
                          for(int j=step1Col;j<size;j++)  
                          {  
                               if(spiralMatrix[step1Row][j] == 0)  
                               {  
                                    spiralMatrix[step1Row][j] = ++lastValue;  
                                    step1Col = j;  
                               }  
                               else{  
                                    break;  
                               }  
                          }  
                          step = ++step;  
                     }  
                     //this is the step where value assigned in Vertical incrementing positional way  
                      if (step == 2)  
                     {  
                          step2Col = step1Col;  
                          step2Row = step1Row+1;  
                          for(int i=step2Row;i<size;i++)  
                          {  
                               if(spiralMatrix[i][step1Col] == 0)  
                                    {  
                                         spiralMatrix[i][step1Col] = ++lastValue;  
                                         step2Row = i;  
                                    }  
                                    else{  
                                         break;  
                                    }  
                          }  
                          step = ++step;  
                     }  
                     //this is the step where value assigned in Horizontal decrementing positional way  
                      if(step==3)  
                     {  
                          step3Row = step2Row;  
                          step3Col = step2Col-1;  
                               for(int j=step3Col;j>=0;j--)  
                               {  
                                    if(spiralMatrix[step3Row][j] == 0)  
                                    {  
                                         step3Col = j;  
                                         spiralMatrix[step3Row][j] = ++lastValue;  
                                    }  
                                    else{  
                                         break;  
                                    }  
                               }  
                          step = ++step;  
                     }  
                     //this is the step where value assigned in Vertical incrementing decrementing positional way  
                     if(step==4)  
                     {  
                               step4Row = --step3Row;  
                               step4Col = step3Col;  
                               for(int i=step4Row;i>=0;i--)  
                               {  
                                    if(spiralMatrix[i][step4Col] == 0)  
                                    {  
                                         step4Row = i;  
                                         spiralMatrix[i][step4Col] = ++lastValue;  
                                    }  
                                    else{  
                                         break;  
                                    }  
                               }  
                          step = ++step;  
                     }  
                }  
                System.out.println("Spiral Matrix is:\n");  
                for( int i=0;i<size;i++)  
                {  
                     for( int j=0;j<size;j++)  
                     {  
                          System.out.printf("%5d ",spiralMatrix[i][j]);  
                     }  
                     System.out.println("");  
                }  
           }  
           catch(Exception e)  
           {  
                e.printStackTrace();  
                System.out.println("Something Went wrong............Please run again.....");  
           }  
      }  
 }  

Friday, 10 July 2015

CF Ehcache and Saving Object

Hi,


I came across a situation where Session had too many variables which was getting through a Query. Logging was taking a long time and most of the Session Variables had Limited used only to show Charts on user activity just after Login.

I looked into 2 options for Limited Use Query.
1. Ehcache.
2. Saving as binary data file by using ObjectSave and ObjectLoad.


Ehcache

You can enable Ehcache through CF Admin-> Server Settings->Caching. 


Number of queries cached is 100 by default. You can increase it. If it increases maximum it will delete from the older one and save the new one in Ehcache region.
In my version CF 10 I have Ecache 2.6.6 JARS. Can have max 10000 Queries in Memory


 <cfquery datasource="dsn" name="VARIABLES.getClient"  cachedwithin="#createTimespan(1,0,0,0)#" >  
      SELECT TOP 10 cCompanyName FROM CLIENTS WHERE cCompanyName = 'company'  
 </cfquery>  
 <cfdump var="#VARIABLES.getClient#" >  


Cached will be true. In Normal Queries it will be false


It will save in 'Ehcache' cache region with id '1234' for 1 day

Working
If Same query is ran within 1 day Database layer hitting is surpassed and will get a query object from Ehcahe region. Parameter used should be same & query plan should be same, then only it will get from Cache.

Putting in Different cache region
We can save in different cache region too.
 <cfset cacheRegionNew('clients')>  
 <cfquery datasource="dsn" name="VARIABLES.getClient" cacheregion="clients" cachedwithin="#createTimespan(1,0,0,0)#" >  
      SELECT TOP 10 cCompanyName FROM CLIENTS WHERE cCompanyName = 'company'  
 </cfquery>  
 <cfdump var="#VARIABLES.getClient#" >  
We can't get the above Cached query  by using 'cacheGet' function. It will show 'undefined'.

We can put in CacheRegion with CacheId using 
 <cfset cachePut(1234,getClient,createTimespan(1,1,1,0),'','clients')>  

To retrieve Cached Query object 

We can verify whether the CacheRegion or CacheID exists before getting Query object.
 <cfif cacheRegionExists('Ehcache')>  
      <cfif cacheIdExists('1234','Ehcache')>  
           <cfdump var="#cacheGet(1234,'Ehcache')#" >  
      </cfif>  
 </cfif>  

Saving Query as Binary In Data File

We can save Query object in Data File as Binary Format.We can relative path for saving it in file.
 <cfquery datasource="rsa" name="VARIABLES.getClient">  
      SELECT TOP 10 cCompanyName FROM CLIENTS WHERE cCompanyName = 'company'  
 </cfquery>  
 <cfset objectSave(getClient,'../parent/client.txt')>  
To retrieve it 
 <cfdump var="#objectload('../parent/client.txt')#" >  

In 'Ehcahe' Cache region will be in Server Space. If the parameter is changing the Cached query will be used less. The Object Saved will be on Physical file as the Query runs it will be updated if we are saving it in Same page.
I went for 'Ehcache' option as it was very helpful in this particular case.

Friday, 5 June 2015

CFSCHEDULE & Scheduled Taks

Hi,

I came to know some nice functions of Scheduled Tasks and  CFSHEDULE.

I had a task like the Records will get fetch from DB, there will be a huge number of records. Have to send records through HTTP, but the records sending should be as fast as possible. With one file I couldn't make that so I used 3 files which gets Query result from parent page and executes. I used the chained task feature in CF Admin Scheduled Tasks and CFSHEDULE run action.

cfschedule

The task should be set up in CFADMIN before using through CFSCHEDULE.

Used to run the already defined scheduled task. It will run in real time.
 <cfschedule action="run" task="scheduledTask2" >  

To pause all the task, only 'pause' can be used to pause a specific task.
 <cfschedule action="pauseall">  

To update the existing task we can use UPDATE action. We can set most of the settings through Update action.
 <cfschedule action="update" repeat="2" onmisfire="FIRE_NOW" url='http://localhost/ColdfusionDemo/Practise/scheduledTask1.cfm'   
      startdate="#createDate(2015,6,05)#" starttime="10:00 PM" enddate="#createDate(2015,6,05)#" endtime="11:00 PM" interval="once" task="scheduledTask1">  

To list Scheduled task we can use LIST action, we get query object as a result having all settings.
 <cfschedule action="list" task="scheduledTask1,scheduledTask2" result="res">  
 <cfdump var="#res#" >  

Other actions are DELETE,RESUME,RESMUE ALL

Note:
1. The paused tasks can't be run through RUN action.
2. The chained tasks cannot be paused or resumed through PAUSE ALL, PAUSE, RESUME or               RESUME  ALL action.
3. Except On Chained, On Complete and Daily Every sections other sections can be set through UPDATE action.

Scheduled Tasks


We can set Scheduled tasks in Admin Server Settings->Scheduled Tasks.

Scheduled Task panel


In this we can set Task Name,URL and other settings.


The Most of Options in Settings are self explanatory.


  • ScheduledTask1 is a child Task of ScheduledTask2. ScheduledTask1 will run after completion of ScheduledTask2. 
  • We can publish the output in .txt or .log file. By choosing Publish.
  • Cluster is for Enabling to Execute tasks in Cluster Setup.

One can refer through each settings in detail at Right Side Upper Help Button in CF Admin.


Sunday, 17 May 2015

Updating Query Column value in CF

Hi,


I faced a  problem while updating a Date value in in Query Object.

I had one task to change date of one column by checking Date value of other column of same query object.

For updating Query Column value most of people use javacast(type,variable) function.

Accepting types in javaCast are
bigdecimal,boolean,byte,char,double,byte,char,double,float,int,long,null,short and string

These are all from java.lang class. But there is no Type for date or datetime

I found there are three date classes used in CF (that can be more).

In This is code snippet , By making Query object adding cell and values and updating values.

 <cfset VARIABLES.user = queryNew('SENDDATE,AGE','date,Integer')>  
 <cfset VARIABLES.userDate1 = createDate(year(now()),month(now()),day(now())-2)>  
 <cfset VARIABLES.userDate2 = createDate(year(now()),month(now()),day(now())-3)>  
 <cfset VARIABLES.userDate3 = createDate(year(now()),month(now()),day(now())-4)>  
 <cfset VARIABLES.t = queryAddRow(VARIABLES.user,1)>  
 <cfset QuerySetCell(VARIABLES.user,'SENDDATE',VARIABLES.userDate1)>  
 <cfset QuerySetCell(VARIABLES.user,'AGE',21)>  
 <cfset VARIABLES.t = queryAddRow(VARIABLES.user,1)>  
 <cfset QuerySetCell(VARIABLES.user,'SENDDATE',VARIABLES.userDate3)>  
 <cfset QuerySetCell(VARIABLES.user,'AGE',22)>  
 <cfdump var="#VARIABLES.user#" >  
 <cfloop query="VARIABLES.user">  
      <!---Sample of updating a column value --->  
      <cfset VARIABLES.user['age'][VARIABLES.user.currentRow] = VARIABLES.user.age +1>  
      <!---We can do javacast also for this --->  
      <cfset VARIABLES.user['age'][VARIABLES.user.currentRow] = javacast("int",VARIABLES.user.age +1)>  
      <!---We can update date by normal assigning --->  
      <cfset VARIABLES.user [ 'SENDDATE' ][ VARIABLES.user.currentRow ] = createDate(year(now()),month(now()),day(now())-10) >  
 </cfloop>  
 <cfoutput >  
           #getMetadata(VARIABLES.user.SENDDATE).getName()#</br>  
           #getMetadata(VARIABLES.user.AGE).getName()#</br>  
 </cfoutput>  
 <cfdump var="#VARIABLES.user#" >  


Here is the second one where getting result by Executing Query.

 <cfquery name="VARIABLES.activity" datasource="rsa">  
 SELECT top 1 DATEADD,LISTIDS,EMAIL_ID FROM emaillist WHERE DATEADD IS NOT NULL       
 </cfquery>  
 <cfdump var="#VARIABLES.activity#" >  
 <!---Sample of updating a column value of Query Object we can use javaCast(type,variable) only for Email_ID or ListIDS here  --->  
 <cfset VARIABLES.activity['EMAIL_ID'][VARIABLES.activity.currentRow] = VARIABLES.activity.EMAIL_ID +5>  
 <cfset VARIABLES.activity['DATEADD'][VARIABLES.activity.currentRow] = createDate(year(now()),month(now()),day(now())-10)>  
 <cfdump var="#VARIABLES.activity#" >  


The normal CF date

 <cfset VARIABLES.now = now()>  
 <cfoutput >  
 In Normal CF:<br/>   
      #getMetadata(VARIABLES.now).getName()#<br/>  
 </cfoutput>  


As you can see there are 3 Date class in above.

1) The Query Object Created and added Date from CF is java.sql.Date.
2) The Query Object got from SQL server is  java.sql.Timestamp
3) The normal Date in CF is coldfusion.runtime.OleDateTime

We can update using just by assigning value. If we use javaCast it will make us confuse.

Note: 
QOQ-Query of Query(DBTYPE='QUERY') can't be used on the updated Query object


Wednesday, 29 April 2015

CFSELECT usage

Hi,

By using <CFSELECT> we can save time. With normal <select> with CF code will be time taking and we have to write lines of code to achieve little things also.

Some points to be noted while using CFSELECT

  1.  CFSELECT should be inside FORM/CFFORM tag. Else it gives Context Validation error.
  2. When 'query' attribute used we should only have query column in 'value' attribute
  3. When 'Bind' attribute is used. Send CFC method result as JSON format or as 2 dimensional array. Have securejson="false" returnformat="json" attributes in method.
  4. Have 'value' or 'display' attribute while using ''bind'.
  5. You can't add <CFSELECT> through javascript/jQuery inside form. It will give context validation error.
  6. Use #(condition check)# instead of  <CFIF> in attributes.

Displaying query:
 <cfquery name="clients" datasource="bsa">  
           SELECT cCompanyName,clientID FROM CLIENTS  
 </cfquery>  
 <cfselect name="clientCF1" multiple="true" query="CLIENTS" display="cCompanyName" message="Please select one value" group="cCompanyName" value="clientID" selected=#v#>  
 </cfselect>  

In normal Select we have to use <CFLOOP> and go through and display in <option>.Group will form group of options under that label. In normal select we have to use
 <optgroup label=''></optgroup>  


 <cfselect name="clientCF2" multiple="true" message="One of the value should be selected" required="true"   
           bind="url:bindFc.cfc?method=getClients" bindonload="true" display="cCompanyName" group="cCompanyName" value='clientID'>    
 </cfselect>       


In CFC
 <cfcomponent>   
  <cffunction name="getClients" access="remote" securejson="false" returnformat="json">  
     <cfquery name="clients" datasource="bsa">  
                SELECT cCompanyName,clientID FROM CLIENTS  
           </cfquery>  
           <cfreturn clients>  
   </cffunction>   
 </cfcomponent>  

We can bind the value in realtime without using ajax.
 <cfselect name="clientCF3" multiple="true" message="One of the value should be selected" required="true"   
           bind="url:bindFc1.cfc?method=getClientsByID&id={clientCF2}" display="cCompanyName" group="cCompanyName" value='clientID'>  
      </cfselect>       
In CFC
 <cfcomponent>  
 <cffunction name="getClientsByID" access="remote" securejson="false" returnformat="json">  
           <cfargument name="id">  
     <cfquery name="clients" datasource="bsa">  
                SELECT cCompanyName,clientID FROM CLIENTS WHERE clientID=<cfqueryparam value="#arguments.id#" cfsqltype="cf_sql_bigint" >  
           </cfquery>  
           <cfreturn clients>  
   </cffunction>   
 </cfcomponent>  

Try to use CFSELECT instead of normal SELECT where ever possible.

Thanks,

Friday, 27 March 2015

ODBC Driver Creation and CSV Import

ODBC Drivers which provides a universal data access interface. With ODBC, application developers can allow an application to concurrently access, view, and modify data from multiple, diverse databases.

There are many ODBC drivers in MS Acess, they will come up with new drivers for others shortly. I will explain basic (*.txt,*csv) Drivers.

We need schema.ini file which tells the column names, character set and Header reqired.

schema.ini

It usually contains
 CharacterSet=OEM  
 Col1=Group Char Width 30  
 Col2=ID Integer 


To set Up ODBC DSN:

Control Panel->Administrative Tools->Data Source


Click On 'Finish' give name for ODBC drive and select directory where you have 'schema.ini'.

To Set Up ODBC DSN in CF

Data & Services-> Data Sources->Add New Data Source

Give name for DSN and select ODBC socket from Drop down.


After adding DSN.


You will see the ODBC name which is set in the MS Acess before. Submit and DSN is ready to use.

To Read CSV from ODBC Driver

 <cfscript>  
      queryService = new Query();  
                queryService.setDataSource('csv');  
                queryService.setName("GetData");  
                queryService.setSql("SELECT * FROM sample.csv");  
                GetData = queryService.execute().getResult();  
 </cfscript>  
 <cfdump var="#GetData#" >  

You can get contents of CSV file into a Query object by using this.


File Header in column name and values under it as contents.

You can read text files also First Line will be column name. Subsequent lines will be values under it as contents.


In CF file processing is taken care by ColdFusion10/cfusion/CustomTags/com/adobe/coldfusion/base.cfc

We can easily read CSV files and make it into Query object.

Tuesday, 10 March 2015

Reading DOC file and writing in PDF using HWPF,LOWAGIE objects

Hi,

I came across writing into PDF using HWPF,LOWAGIE  objects in CF as well as in JAVA. Here I am reading a DOC file and copying contents to a PDF. It can be used alternate to CFDOCUMENT for CF8 below versions.

Required JARS are


 <cfscript>  
      // Creating JAVA fileinput stream object  
      fileinput = CreateObject("java", "java.io.FileInputStream");  
      // Calling InputStream constructor  
      fileinput.init("C:\Users\admin\Adobe ColdFusion Builder workspace\Practise\word.doc");  
      //Creating HWPF object  
      document = CreateObject("java", "org.apache.poi.hwpf.HWPFDocument");  
      // Calling HWPF constructor  
      document.init(fileinput);  
      // Creating a WordExtractor Object  
      reader = CreateObject("java", "org.apache.poi.hwpf.extractor.WordExtractor");  
      // Calling WordExtractor constructor  
      reader.init(document);  
      //Each line is captured in docfile as an array  
      docfile = reader.getParagraphText();  
      //Dumpingto see Docfile in array format  
      writeDump(docfile);  
      docfilefull = '';  
      //convertingarray to string  
      for(a in docfile)  
      {  
           docfilefull = docfilefull & a & chr(13) & chr(10);  
      }  
      //Creating lowagie object  
      document = CreateObject("java", "com.lowagie.text.Document");  
      // Calling lowagie constructor  
      document.init();  
      // Creating FileOutputStream object  
      fileIO = CreateObject("java", "java.io.FileOutputStream");  
      // Calling FileOutputStream constructor with path/name of file to written  
      fileIO.init("C:\Users\admin\Desktop\word19.pdf");  
      // Creating PdfWriter object  
      writer = CreateObject("java", "com.lowagie.text.pdf.PdfWriter");  
      //Calling getInstance method  
      writer.getInstance(document, fileIO);  
      //Calling open method of lowgie object  
      document.open();  
      // Creating Paragraph object  
      paragraph = CreateObject("java", "com.lowagie.text.Paragraph");  
      //Calling paragraph constructor passing the string which have the doc file content  
      paragraph.init(docfilefull);  
      //Writing the PDF document with DOC contents  
      document.add(paragraph);  
      //Closing document  
      document.close();  
 </cfscript>  

Friday, 20 February 2015

0x8007052e error In IIS

Hi,

 I got to resolve '0x8007052e' error. This error was coming only to virtual directories in IIS.


Normally reason for this type of error will be changing of Admin password of your system.

So how to resolve this error.

IIS Manger->Default Website->[Directory Name]


Change password with newly changed Admin password


Now you can run your file with out getting any error.

Note: If Admin passwords are used in CF admin data source and SQL. You have to change that also to use Datasource.

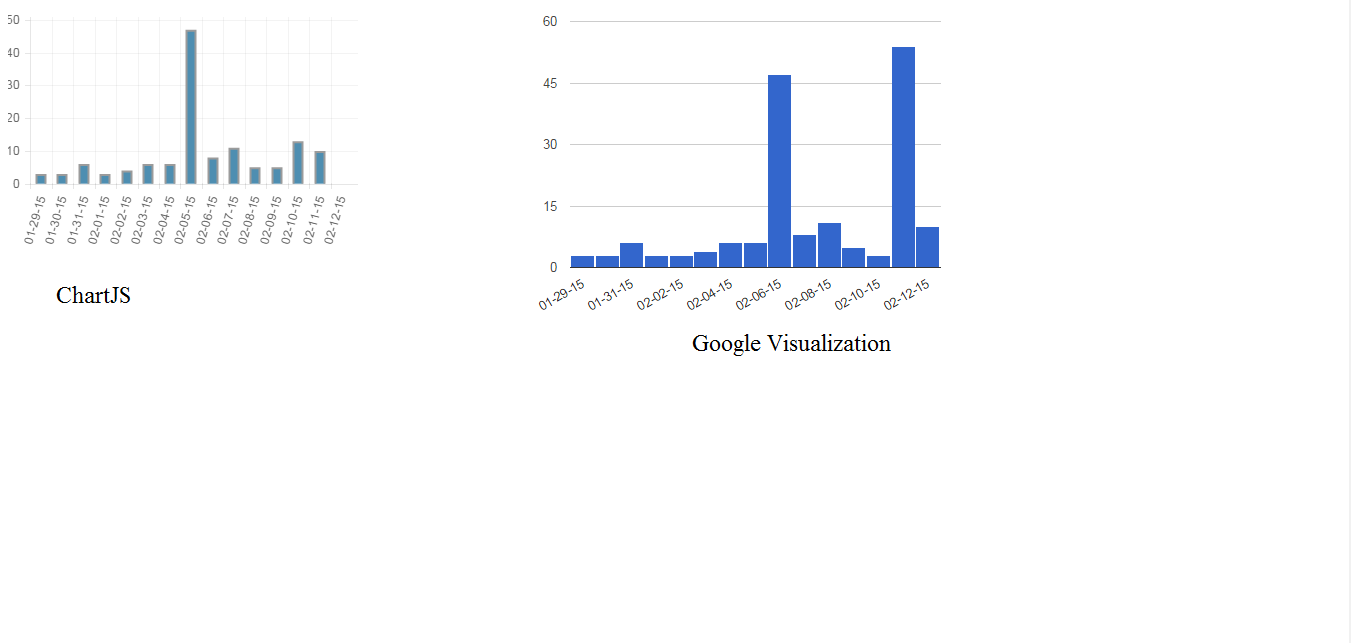
ChartJS & Google Visualization

Hi,


I got a chance to learn  ChartJS and Google Visualization. Both are basically for preparing charts using data, so user can feel more better with their data. How things are going point by point.


ChartJS

It have 6 types of different Chart, we can build charts directly. Documentation is also very handy, very easy to understand.

Documentation: http://chartjs.org/docs/

For linking: <script type="text/javascript" src="http://chartjs.org/assets/Chart.js"></script>

I have a fiddle to show

http://jsfiddle.net/ramakrishnap/0Lfzx74v/


Google Visualization(Google Charts)

In this there are many kinds of Charts,Graphs it also have pagination techniques. Understanding documentation takes time, implementation needs much care. It is rich with UI and functions.

Documentation: http://developers.google.com/chart/interactive/docs/reference

For linking: <script type="text/javascript" src="https://google.com/jsapi"></script>

I have a fiddle to show

http://jsfiddle.net/ramakrishnap/4gtLc9ss/


Tuesday, 10 February 2015

SMPP & CF


SMPP(Short Message Peer-to-Peer) protocol. The primary use of SMPP is to send and receive medium-to-high volumes of SMS texts.

The protocol is based on pairs of request/response PDUs (protocol data units, or packets) exchanged over OSI layer 4 (TCP session or X.25 SVC3) connections.

SMSC(SMS Centre) providers use both HTTP and SMPP for sending and receiving SMS texts.


  • Advantages of SMPP over HTTP
  • High-volume SMS messaging with a high speed. 
  • Delivery report with much info.
  • Network related info.
  • Efficient use of PDU over HTTP post.


Setting up SMPP event gateway in CF admin

For setting up Event Gateway we need a cfc file to receive acknowledgements/messages and a cfg file having configuration of port and shortcode of SMSC.

Go to 


CF ADMIN>Event Gateways > Gateway Instances


The major function of the cfc are:

onIncomingMessage:Every incoming message from SMSC and Delivery ack is handled by this function.Signature : public  function onIncomingMessage(required struct CFEvent)
Note :We can have other functionalities in CFC for logging and fetching the information.  


The CFG file should contain :


# Type of binding.Value can be either transciever,transmitter or receiverbinding=transciever
# This is the IP address of SMSCip-address=102.208.328.100
# Port to bind toport=80001
# Your system idsystem-id= demo_99647878
# Your passwordpassword= MinDFire6824

Note : Port differs depending on Shortcode.


Sending and Recieving Messages in SMPP

We need to buy a ShortCode  from SMSC, and get configuration details for ShortCode. CFC and CFG files are configured in cfadmin as above. We will use 'SUBMIT' and 'SUBMITMULTI' commands for individual and group broadcasts respectively.

Demo  for Sending and receiving messages

send.cfm
 <cftry>  
   <cfscript>  
      VARIABLES.cellNumList ='1234567890'; //CellNumber list  
      VARIABLES.msg = structNew();  
      VARIABLES.msg.command = "submit";  
      VARIABLES.msg.destAddress = VARIABLES.cellNumList;  
      VARIABLES.msg.shortMessage = 'Test Message from SMPP';  
      VARIABLES.msg.alertOnMsgDelivery = "1"; //To get delivey ack  
      VARIABLES.msg.sourceAddress = '1234'; //Shortcode Registered  
      VARIABLES.msg.registeredDelivery = "1";  
      VARIABLES.result = sendGatewayMessage("SMS Menu App", VARIABLES.msg);  
   </cfscript>  
   <cfoutput>  
    <!---We will get orderno, if success else empty response --->  
    Result - #InputBaseN( VARIABLES.result , 16 )#  
   </cfoutput>  
 <cfcatch type="any" >  
   <cfoutput>Oops!! Something went wrong #CFCATCH.message#</cfoutput>  
 </cfcatch>  
 </cftry>  

recieve.cfc


component  hint="SMS Event Gateway CFC" output="false"

{
 /**
 @hint Standard Message From CF server
 @Displayname onIncomingMessage
 @output false
 */
 public  function onIncomingMessage(required struct CFEvent)
 {
   try
   {
  var data = ARGUMENTS.CFEvent.DATA;
 /* If the message came from a handset and Operator,Network info is there */
  if(isDefined("data.data.optionalParameters")){
    writeLog(text='Incoming handset message from #data.data.sourceAddress# message is #data.data.Message#',file='incomingMessageLog'); 
    }
 /* When message doesnt contains optional parameter, only delivery notification*/
  else{
    writeLog(text='Delivary ack from #data.data.sourceAddress# and status is #data.data.message#',file='incomingMessageLog');
   }
  }
  catch(any ex)
  {
   /* Log the return Value into the Log file*/
    writeLog(text='Oops!! Something went wrong #CFCATCH.message#',file='incomingMessageLog');
  }
  
 } 
}


PDU(Protocol Data Unit)'s of SMPP


SUBMIT_SM:
This is used in individual broadcast of SMS.


SUBMIT_MULTI:
This is used in Group broadcast of SMS.

PDU of Received Acknowledgement:


This is the PDU we get in recieve.cfc after SMS delivered to user's cell number. We can get Info about the delivered time, status and error.

PDU of Received Message:

This is the PDU we get when the Shortcode assigned receives a message from User. We will have 'Message' which is texted. We can decrypt 'optionalParameters' for getting vendor info and other info related to Wireless Network .

Resource:
http://docs.nimta.com/SMPP_v3_4_Issue1_2.pdf
http://www.activexperts.com/sms-component/smpp-specifications/introduction/
http://help.adobe.com/livedocs/coldfusion/8/htmldocs/help.html?content=UseSMSGateway_06.html
http://help.adobe.com/livedocs/coldfusion/8/htmldocs/help.html?content=gateways_79.html#1172422